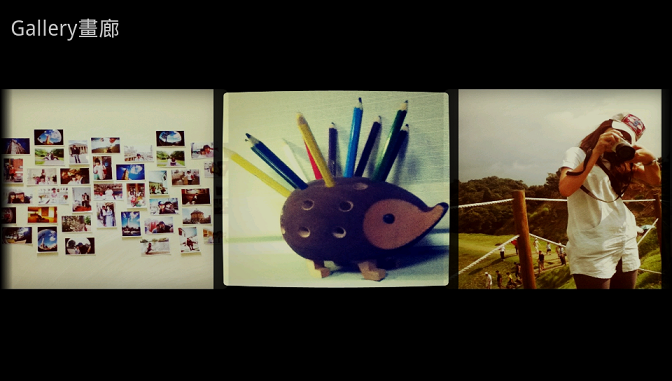
瀏覽相片時,流暢拖曳圖片的操作方式總是非常吸引人,在Android上要實現必須用到的技巧不少,包括: android.content.Context、android.widget.BaseAdapter、android.widget.ImageView等等,這樣子的技巧通常使用在設計相簿、圖片型態的選擇器上。
首先,需了解何謂Context以及BaseAdapter,在Activity當中Context就如同是一張Canvas畫布,隨時等著被處理或是覆蓋,本範例在Layout布局一個Gallery物件,再透過BaseAdapter容器存放Gallery所需要的圖片。
本程式較為重要的部分,是在其中建立了一個繼承自BaseAdapter的ImageAdapter方法,這個ImageAdapter存在目的為暫存想要顯示的圖片,並當成Gallery控制圖片的來源參考。
java檔
import android.app.Activity;
import android.content.Context;
import android.os.Bundle;
import android.view.View;
import android.view.ViewGroup;
import android.view.Window;
import android.view.WindowManager;
import android.widget.BaseAdapter;
import android.widget.Gallery;
import android.widget.ImageView;
import android.widget.TextView;
public class example001 extends Activity {
private TextView mTextView01;
/** Called when the activity is first created. */
@Override
public void onCreate(Bundle savedInstanceState) {
super.onCreate(savedInstanceState);
requestWindowFeature(Window.FEATURE_NO_TITLE);
getWindow().setFlags(WindowManager.LayoutParams.FLAG_FULLSCREEN,
WindowManager.LayoutParams.FLAG_FULLSCREEN);
setContentView(R.layout.main);
mTextView01 = (TextView)findViewById(R.id.TextView01);
mTextView01.setText(getString(R.string.str001));
((Gallery)findViewById(R.id.gallery01)).setAdapter(new ImageAdapter(this));
}
public class ImageAdapter extends BaseAdapter{
private Context myContext;
private int[] myImageId = {
R.drawable.a01,
R.drawable.a02,
R.drawable.a03,
R.drawable.a04,
R.drawable.a05,
R.drawable.a06,
};
public ImageAdapter(Context c){
this.myContext=c;
}
@Override
public int getCount() {
// TODO Auto-generated method stub
return this.myImageId.length;
}
@Override
public Object getItem(int position) {
// TODO Auto-generated method stub
return position;
}
@Override
public long getItemId(int position) {
// TODO Auto-generated method stub
return position;
}
@Override
public View getView(int position, View convertView, ViewGroup parent) {
// TODO Auto-generated method stub
//建立一個ImageView物件
ImageView i = new ImageView(this.myContext);
//設定ImageView物件的資料來源
i.setImageResource(this.myImageId[position]);
i.setScaleType(ImageView.ScaleType.FIT_XY);
//設定ImageView的寬高,單位為dip
i.setLayoutParams(new Gallery.LayoutParams(350, 300));
return i;
}
//根據,距離中央的位移量,利用getScale回傳view的大小
public float getScale(boolean focused, int offset){
return Math.max(0, 1.0f/(float)Math.pow(2, Math.abs(offset)));
}
}
}
main.xml
<?xml version="1.0" encoding="utf-8"?>
<LinearLayout xmlns:android="http://schemas.android.com/apk/res/android"
android:orientation="vertical"
android:layout_width="fill_parent"
android:layout_height="fill_parent"
>
<TextView
android:layout_width="fill_parent"
android:layout_height="wrap_content"
android:id="@+id/TextView01"
android:textSize="20sp"
android:text="Gallery畫廊"
/>
<Gallery xmlns:android="http://schemas.android.com/apk/res/android"
android:layout_marginTop="30sp"
android:id="@+id/gallery01"
android:layout_width="fill_parent"
android:layout_height="wrap_content"
/>
</LinearLayout>
p.s請記得事先要將圖片載入

Gallery官方參考
http://developer.android.com/resources/tutorials/views/hello-gallery.html
sdk0092.project
